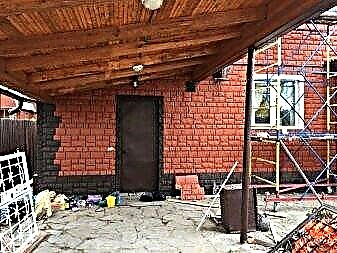
Many beginning masters, who started independent repairs, are interested in how to plaster drywall correctly. Indeed, gypsum plasterboards after installation require some manipulations before finishing: sealing and reinforcing seams, glossing indentations from screws, and finally leveling the entire plane. But not everyone knows what material is used for these purposes - plaster or putty. Let's see if plasterboard needs to be plastered, what materials are used for roughing it, and consider the case when plastering is really necessary.

Do I need to plaster drywall?
The most frequently asked questions regarding gypsum plaster will be as follows:
- How to plaster drywall for wallpaper?
- How to plaster the ceiling and drywall?
- How to plaster drywall walls?
The answer in the vast majority of cases will be one: no way. Drywall is sometimes called dry plaster, since drywall sheets attached to the frame perform the same function as the stucco mixture applied to the wall: level it. But these questions arise because not everyone sees the difference between plaster and putty.
Plaster is a material for rough rough leveling. It has a coarse-grained structure, can be applied with a sufficiently thick layer and is designed to eliminate significant base defects. Even the finest-grained gypsum plaster mix cannot serve as a substitute for putty during GKL processing, since it cannot be applied with such a thin layer.

Putty is a finely divided building mixture, due to which it can be applied with a layer thickness of only a few millimeters. It is the putty after drying that allows you to get a perfectly smooth surface, which we expect to see after finishing the walls with drywall.
Thus, walls, ceilings and any other drywall constructions need not be plastered, but puttyed. And if you come across tips about the rules of plastering GKL, do not trust such an article - it was written by an incompetent author.
Plaster on gypsum board is applied only in one separate case, which is, rather, an exception to the rule and will be described later.
Drywall putty
So, we found out that instead of plastering, putty should be applied to the gypsum board. In this case, the question may arise about how much it is really needed. Some believe that under the wallpaper it is enough to apply a primer to the surface of the drywall wall, but this solution cannot be called correct.
In the case of gypsum plaster, putty performs the following tasks:
- Fills the seams between the sheets, strengthening the weaknesses of the joints.
- It masks the grooves from the self-tapping screws, with the help of which the drywall sheets are attached to the frame, prevents the appearance of rust from the screws on the finish.
- It hides small cracks and dents that may appear during installation.
- Allows you to make the surface for painting, so that it looks perfectly even and smooth.
- When preparing the gypsum board for wallpapering, it forms a protective layer that allows the wallpaper material not to stick to the cardboard surface “tightly”. If you skip the puttying stage, remove the wallpaper during subsequent repair from the drywall, without damaging it, it will not work.

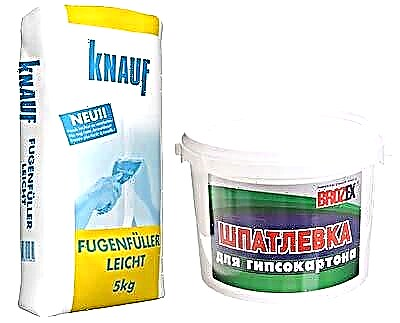
Important! To seal the joints between the sheets of drywall and puttying the entire surface, different putty mixtures are used. In the first case, you need to use a special putty for joints, for example, “Knauf Uniflot”, in the second - the finishing thin-layer putty mixture.
You can read about the rules for closing seams using paper tape or a sickle here.
Drywall putty technology from "A" to "Z" is described in detail here.
When is plastering allowed on drywall?
Plasterboard walls and ceilings can be plastered in one single case: when the structure is mounted unevenly and poorly. If mistakes were made during the installation of the frame, the profiles or wooden beams were not set to level, there may be deflections and protrusions on the finished drywall surface, it may be blocked.
In this case, there are two ways:
- Remove the drywall sheets, disassemble the frame and mount again.
- Align the plane with plaster.
Since during the dismantling and re-fastening of sheets they can be damaged, in some cases it will be easier to plaster the surface.
We align the plasterboard curved surface with plaster
In order to correct the mistakes made during the installation of the plasterboard ceiling or wall and prepare it for the finish, you will need:
- Spatulas are wide and narrow.
- Gypsum plaster.
- Putty for joints and finishing.
- Primer "Concrete contact" and the roller for its application.
- Paper tape, sickle net or fiberglass, cut into strips about 7 cm wide.
- Construction mixer, container for mixing the mixture.
- A long level or rule.

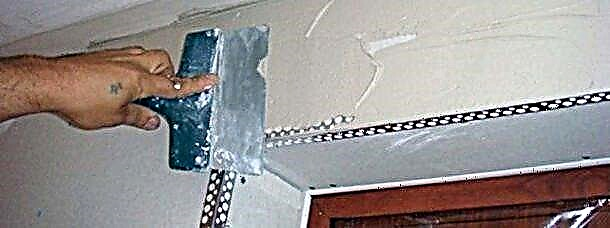
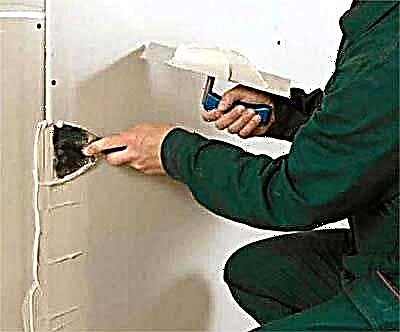
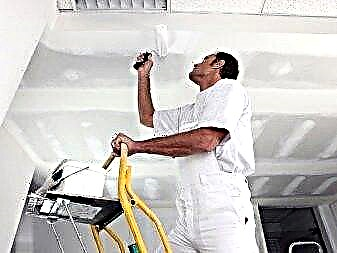
Getting to work. The first stage is repair of joints, surface preparation.
- We remove the chamfers from the edges of the drywall sheets with a sharp construction knife, if this was not done before installation.
- Grounding the seams. After drying, fill them with special putty for joints. We reinforce joints: if paper tape is used, it is glued exactly in the center of the seam to putty, for fiberglass it is better to use PVA glue.

- The same putty mixture is covered with holes from the heads of the screws.
- After drying, the entire drywall surface is primed with a Concrete Contact primer.
The drywall primer before applying the plaster will prevent the material from getting wet and will improve the adhesion of the plaster mix to a smooth cardboard surface.
How should plasterboard be plastered for leveling purposes? Further actions depend on the scale of the bumps.
If the recesses on the surface are small, you can use the method of plastering on sir:
- The recess is filled with plaster mixture.
- The solution is stretched by the rule. The recess turns out to be filled with plaster, on a flat area its layer will turn out to be small.
In case of more serious irregularities and distortions, you should use the beacon profile, which is set in level so that after applying the plaster a flat plane is obtained.
After the plaster dries, the surface should be sanded and putty in the usual way. For painting, you need to apply 2-3 layers, one will be enough for the wallpaper.
Why gypsum plasterboard
Plasterboard walls represent an almost perfect plane and do not need additional alignment. Therefore, their plastering is used only as a final decorative design. Also, in small quantities, a leveling solution is applied to the gypsum board to hide the joints of sheets, small dents and screws used for fastening to the metal profile. In fact, this is a putty, and it is mandatory for roughing with this material for wallpaper, tile or decorative plaster.
As already mentioned, at the sheets on the wall or at the drywall box, it is necessary to close the joints and caps of the screws. To do this, mix dry gypsum plaster or use the finished paste in buckets. For moisture-resistant sheets GKLV it is better to choose compositions based on acrylic.
Plaster or putty?
They differ mainly in grain size. The smaller the grain of the bonding element, the thinner the minimum applied layer, less roughness. For example, the popular KNAUF Rotband universal plaster shows the largest fraction size of 1.2 mm. But in fact, the particles of gypsum are, of course, smaller. It's just that they are sifted less thoroughly than in putty. Therefore, after mixing with water, grains are visible in the solution. The putty has the consistency of sour cream.
Knauf recommended by the manufacturer the thickness of the applied layer of plaster is 5-50 mm, for KNAUF Rotband Finish putty - 0.2-5 mm.
If you need to align the large depressions and pits - take the plaster. After drying, putty in it or go with the smallest grater. In case of hiding the joints of drywall, you can immediately take the putty.
Let's get back to processing GKL joints.
Necessary materials and tools

- Container for mixing dry mix,
- primer, for example, polymer Knauf Tiefengrund,
- narrow and wide spatula,
- Painting net,
- construction knife
- grater
- brush,
- dry mix or paste in a bucket.
How to plaster GKL correctly
- Before plastering the edges of the drywall are cut with a knife at an angle of 45 °. At the junction of the sheets, an angle of 90 ° is obtained. By the way, small planers are sold specifically for chamfering, they are used even before fixing the gypsum board to the wall.
- Brush or brush dust off.
- The cut chamfer is primed so that the moisture from the putty does not go into gypsum and the seam does not crack.
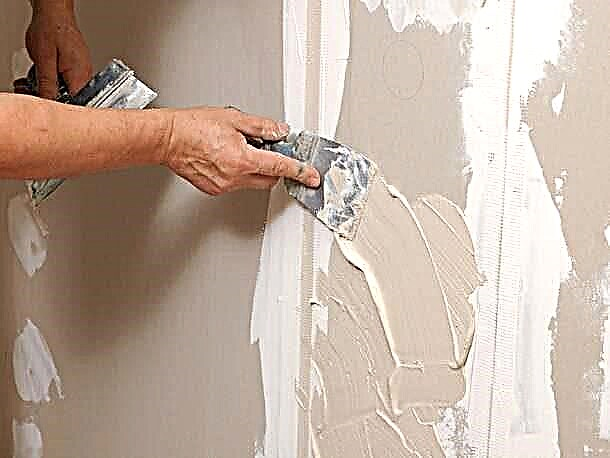
- Putty is mixed in a tray or bucket. Suitable for this is ordinary cold tap water. If there is no time to calculate the proportions recommended by the manufacturer, then you can correctly select the consistency of the mixture as follows. Fill half of the container with water, take a putty from the bag with your small scoop or do it yourself and evenly! pour over the entire surface of the water. Pour until putty goes under water. As soon as the water stops hiding the powder, you can begin to mix. It is better to do it manually with a small spatula.
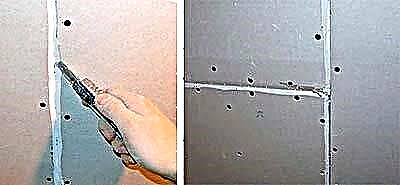
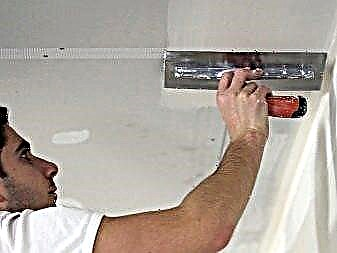
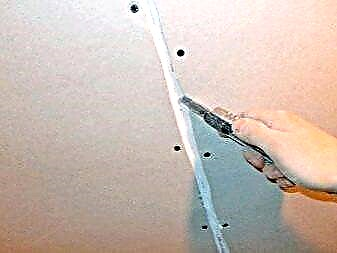
- Next, the GKL seam must be filled with putty and leveled along the entire length. It is more convenient to apply with a narrow spatula.
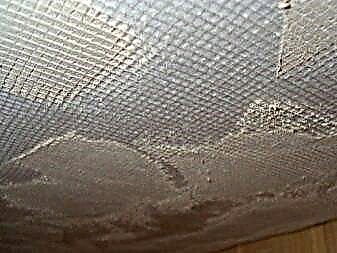
- A reinforcing mesh is applied to the fresh solution and slightly pressed. Then it is covered over the entire length and width with a new layer of putty. Use a wide spatula to align.


Important! It is worth paying attention to the viability of the prepared solution and its drying time. These figures are dependent on the binder. For example, the knitted gypsum putty KNAUF Uniflot dubs after 30 minutes, and after 1 hour its layer on the wall dries completely. A polymer mixture WEBER-VETONIT with marble filler allows you to work with the solution for 24-48 hours, but the drying time of the layer will be 24 hours.

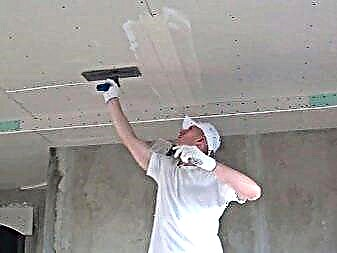
Stucco ceiling fundamentally no different from work with gypsum wall paint. The same tools and materials are used. Particular attention should be paid to the joint of the ceiling and walls.
Decorative plaster: types and features
Now consider the issue of plasterboard walls in the literal sense of the word, when the entire surface is covered with a beautiful decorative layer.
- Venetian. Its main feature is the combination of several colors and a glossy surface, often imitating marble.
There are ready-made compounds in buckets. But you can do it yourself to prepare a mixture for the Venetian on the basis of universal plaster, tinting it with tinting.
Usually several layers are applied: the first one can be just white. He creates the texture and small irregularities. The second layer, colored by color, highlights the texture. The third - adds color, shades or brightens certain areas.
A good welcome would be to lightly grout the dried mixture. At the same time, the tops of the ledges of the texture will be removed and the lower white layer will appear. Venetian gloss gives a protective wax applied at the very end.
- Textured (embossed). This name is conditional, because any plaster with a beautifully created textured pattern can be attributed here. But there are also well-established species, such as the “bark beetle,” which imitates a tree emitted by insects. The pattern can be the most diverse, abstract or geometric, repeating or chaotic. It all depends on the imagination of the master. To create an invoice, use a spatula, trowel, rough brush, sponge, special rollers and dies, and so on.

- Stucco. This type includes marble plaster with a crumb of natural material, various flocks (chips) in the form of thin plates, pebble plaster with the effect of "fur coat", and others. As a rule, they are sold ready-made, sometimes additionally tinted in the desired color. Apply evenly and leave to dry completely.

- The liquid wallpaper. This type of decorative finish has a cellulose base with the addition of fillers - silk, cotton, acrylic binders, dyes and other additives. They are sold in bags as well as dry plaster, soaked with water before application to the wall. The walls under the wallpaper are primed. The finished mixture is applied to drywall and leveled with a spatula.
Plastering technology
Apply decorative plaster to drywall after the primer. It will have to be primed twice.
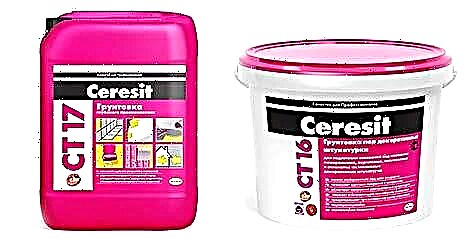
GKL is first coated with a high penetration primer, for example Ceresit CT 17. It will reduce the sensitivity of drywall to water. It is applied with a brush or roller in one layer and left to dry completely.
The second time primed to increase adhesion (adhesion) of the base and decorative coating. Ceresit CT 16, which contains fine quartz sand, gives roughness, is suitable for this.
After the soil has dried, a decorative layer is applied.
If you want to create an abstract drawing, then use a trowel. A small amount of solution is superimposed on it with a spatula, trowel the mixture distributed over the wall and create a texture.
When using embossed rollers to create a pattern, decorative plaster can be applied to drywall with a large spatula, straightened right from the ceiling to the floor. After a few minutes, when the decorative layer begins to set on the wall, it is carried out with a roller, leaving an invisible mark. In place of the roller, you can use various prints and stamps.
Mosaic plaster and liquid wallpaper are simply applied to the wall and level.
If necessary, the surface is coated with a protective wax.

Features
Many of the building materials on the market are designated by abbreviations. One of them - GCR, - is known to everyone as a known drywall. The sheet material consists of paper (cardboard) cladding glued to the gypsum core. Walls, ceilings are sheathed with plasterboard sheets, niches are closed, partitions are made of it. The material creates smooth surfaces, serves to align the walls.

Plasterboard material is inferior in strength to brick, ordinary concrete, wood. Needs to be protected. GKL is attached directly to the wall (sticker) or to the frame (self-tapping screws).
Seams, broken corners, hats of self-tapping screws are not the best sight. The first thing you want in such cases is to cover everything with a plaster mortar.
However, a heavy plaster coating may deform it. Moisture from the solution - distort, reduce strength. Therefore, questions arise about the possibility and necessity of plastering GKL.
Why do it
The cardboard wrapper of gypsum cardboard is unpresentable, therefore, a finishing coating is supposed to be on top of it. Most often, this is a “shirt” of wallpaper or painting. Both of these types of finishes are thin-layered, do not hide joints and fasteners, require a particularly flat, smooth surface. For this reason, drywall before gluing wallpaper or applying a paint composition needs additional alignment using putty or plaster composition.
In addition, gypsum plasterboard serves as a protective layer for easily vulnerable external "adversities" of brittle material.
A separate type of topcoat for hl is decorative plaster. This is a recognized leader among the means of transforming the interior and ways of self-expression of homeowners.
Modern plaster materials allow you to create a unique design, without overloading the load-bearing structures, to protect the drywall against moisture, fungus, mold and rodents, allowing the walls to breathe. To make plasterboard partitions with the effect of malachite, marble or onyx, for example, to decorate the ceiling in the Venetian style with any wallpaper, it will not work, only with decorative plastering.
Types of Drywall
Five types of GCR are produced, the difference of which is in the composition of the core and its properties:
- In addition to the usual wall gypsum board, they also produce gypsum plasterboard ceiling sheet material, which differs from the wall only in smaller thickness. The core is still the same gypsum.
- Moisture-resistant gypsum board lined with green cardboard (GKLV) is used in the interior of bathrooms (even cover the walls in the pools). Moisture treated with antifungal impregnation and other GKLV compounds is not afraid.
- GKLO - fireproof hl with reinforcing and fiber additives suitable for lining fireplaces and chimneys. In case of fire, the cardboard is charred, but the drywall sheet retains its shape.
- The core of the flexible arch GKL is reinforced with fiberglass threads, which allows bending the sheet in different directions with a possible minimum radius of up to 300 mm. It is thinner, more expensive. If you consider that to ensure the strength of the arches that are made of it, GKLA is used, folded in two sheets, the plasterboard structures are decent.
- Moisture-proof combines the qualities of fire-resistant and moisture-proof.
- Combined, used for wall insulation, has a special composition with the addition of expanded polystyrene.

This information will be needed when choosing the type of plaster composition. The shape of the hem is important for monopolizing the seams.
Material selection
Features of drywall walls determine the choice of primer and plaster compositions. For ordinary, ceiling and arched types, solutions that do not give moisture to the base, do not have a lot of water in their composition, or do not contain it at all, are suitable. Conventional mineral mixtures are best left for HCLF, and polymer solutions for plasterboard walls of any type.
Gypsum
Plasterboard gypsum-based gypsum board, popular for dry rooms, is perfect for leveling and decorative finishing. It does not "share" water with the base, quickly seizes, hardens.

- vapor permeability
- easy restoration (repaired without a visible trace of repair),
- low weight coating
- environmental friendliness
- universality (combined with any base),
- it is perfectly molded and polished,
- when hardening does not form shrinkage cracks,
- fire safety
- low thermal conductivity
- mixes easily
- Compared to the cement mixture, the consumption is less
- a perfect base for paints, varnishes, wallpapers.
- low frost resistance
- rabies,
- quick setting.
As already mentioned, gypsum plaster can be used to plaster drywall walls in dry rooms.
Cement
The binder component of the cement mixture is Portland cement. A simple composition with sand as a filler is supplemented by additives that provide the necessary properties. Differs in frost resistance and durability of a covering. Cement plaster for drywall can be made independently or purchased in the form of a dry mixture.

- good adhesion
- availability (large selection, low price),
- easy application
- maintainability
- fire safety
- water resistance
- strength,
- universality
- frost resistance
- durability.
- refers to heavy (not for weak drywall walls),
- long set of strength (at least 3 weeks),
- does not withstand rainfall and vibration.
Suitable for plastering drywall in wet rooms. Complex compositions are also used, for example, cement-lime
Modern polymer compositions
The versatility of polymer compositions is especially appreciated by specialists. Polymer mixes are easy to install, dry quickly, firmly adhere to drywall, do not make the wall heavier.

These include:
- elasticity,
- strength, as well as its quick set,
- water resistance (water repellent and water resistance),
- 25 and more years of service,
- environmental friendliness
- non-shrink
- richness of the palette,
- increased mechanical resistance
- workability
- increased adhesion.
- high price,
- not suitable for alignment,
- are purchased only in finished form.
The best choice for gypsum plasterboard plastering, since they do not “supply” it with water, do not make it heavier, protect it from water ingress.
Tools
For wall plastering with your own hands, you will need conventional tools and devices for plastering:
- spatulas - for applying the solution,
- for priming - rollers, brushes,
- grater,
- mixer,
- the rule
- construction knife
- masking tape
- capacities
- rags.

How to plaster drywall - technology
Let's turn to how to plaster walls from gypsum cardboard correctly. If the irregularities on the surface of the gypsum plaster are small, it is better to plaster on sir:
- put the solution into the recesses with a spatula,
- the mixture is aligned with the rule, resting the tool on the surface of the sheets.

With irregularities with differences up to 10-15 mm, they are plastered with a wide spatula. It is possible to sequentially overlap two layers with the obligatory drying of each.
How to plaster drywall for wallpaper with a large curvature of the walls? If the curvature or surface roughness is too large, plaster along the beacons, applying two layers in succession. Each layer is dried and only then apply the next. After the solution dries, the irregularities are rubbed with fine sandpaper or an abrasive mesh.
For painting
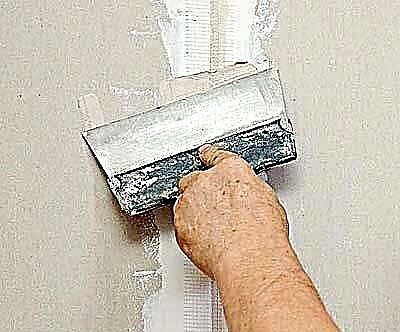
Since the paint layer is able to make visible and emphasize even small flaws, the surface of the gypsum plasterboard for painting is treated with particular care. The plaster layer applied and leveled with a wide spatula (except for gypsum, which is ground to the desired smoothness) is wiped with a grater.
They begin this from the moment when the solution ceases to stick and, with a little pressure, does not push through with a finger. The surface of the solution is moistened. The grater is laid flat and with a little pressure rubbed round. On convex places, the pressure is increased, on the recesses, it is reduced. Dry plasterboard plaster intended for painting is sanded. After this, a primer is applied.
How to plaster drywall under the wallpaper with your own hands
If you are not sure enough about the need for gypsum plasterboard for wallpaper, the following information is for you.
If gypsum board is prepared for wallpaper, a primer and putty / plaster layer is also necessary so that the wallpaper does not adhere tightly to the gypsum board. Otherwise, removing obsolete wallpaper without damaging the drywall base will fail.
Wallpaper, unlike painting, can hide small, minor flaws and errors - small pores, microcracks. Therefore, under the wallpaper, it is quite possible to apply only the starting putty, achieving the absence of protrusions, dents, large pores. The same goes for plaster. When applying the leveling plaster on the beacons, the top layer - the coating - is performed with a fine-grained composition. The surface is wiped, and after drying, it is ground.
You can also find out how to properly drywall plasterboard for wallpaper, from the video.
Is it possible to apply decorative plaster on drywall
Sure you may. Drywall decorative plasterboard is one of the types of finish. The application of decorative plaster on drywall should be preceded by preparatory work, culminating in the application of a primer. Under thin coatings, for example, a Venetian, the surface is additionally puttyed, achieving smoothness. Smooth base is not necessary for structural plasters.

Decorative plaster is applied to drywall with a spatula, roller or trowel in the manner prescribed for the selected effect. Layers of textured plaster are applied sequentially, while each is dried. The decorative layer should not be thick.
Can plasterboard be plastered with a rotband
Among the best plasters for gypsum plaster is a gypsum composition - Rotband (Knauf). It is not only leveling plasterboard for drywall. It can be used to form a decorative coating. It contains gypsum, polymer additives and a lightweight aggregate. The use of a rotband for plastering allows you to create a surface with a different smoothness, which does not require other additional processing.
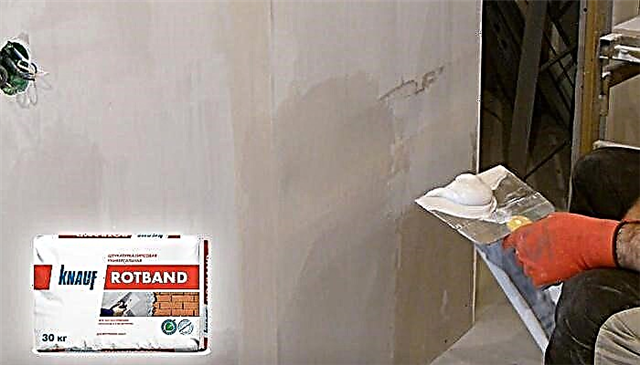
Rothband is used not only for plastering dry rooms. It is suitable for bathrooms, kitchens (except for rooms very wet). The lightness of the composition allows the use of rotband for plastering ceilings. The plaster mix dries quickly. The disadvantages include the ability of the solution to corrode metal objects. Therefore, before plastering, they are isolated.
Drywall plaster or putty what is the difference
It is no coincidence that two building materials have different names. There are significant differences between them:
- Destination Plastering is used to smooth out large deviations and uneven surfaces of the substrate. Putty - for leveling minor irregularities.
- The size of the filler is different. Coarse-grained components are possible in the composition of the plaster mixture, the grain size can reach 5 mm. In the starting putty, the filler grain has dimensions of 80-200 microns (0.08-0.2 mm), in the finish - 20-80 microns, in fine - up to 20 microns. Grain size affects the minimum thickness of the created layer. The putty paste intended for the finish is applied with a thickness of 0.1-0.4 cm.
- Shrink putty less.
- Plaster strength is higher.
- The cost of plaster compositions is lower.
- Application technology also varies. It is possible to apply plaster manually and mechanically, to spread, to impose with a thick layer. Putty composition is applied in small portions and leveled.
Putty can also decorate the walls, as well as plaster.
Tips & Tricks
Needless to say, in every business there are nuances. Drywall plastering is no exception.
- When buying GCR, it is better to immediately get moisture resistant. Indeed, even in a dry room water may appear, for example, neighbors will flood from above. Moisture-resistant cardboard in such cases will help out. You only need to remove the coating that has become unusable (wallpaper, whitewash, paint) and apply a new one.
- Stuccoing starts from the ceiling.
- During the preparation of gypsum plaster for plastering or applying putty, you need to pay attention to the joints. If cardboard leaves the core, then it is cut off, the peeled cardboard remaining at the cut line is ground with sandpaper.
- When performing plastering work, the same conditions are observed as for ordinary plaster: temperature is not higher than + 30 ° C not lower than + 5 ° C. Humidity up to 60%. No drafts and heaters. The electrical wiring is disconnected from the network.
- Nearby surfaces (for example, platbands) are closed to prevent splashing of the solution. Platbands, switches, sockets are covered with masking tape.
- If the choice is between ready-made and dry mixes, dry ones are chosen. They can be bred in the right doses. Ready-made formulations must be developed completely, since after use they are not stored.
- To dilute gypsum mixtures correctly, pouring them into a container with water, scattering on the surface of the liquid. After filling, it can be mixed manually or with a mixer at low speeds. Otherwise, thick lumps form.
- If large splits gap at the joints of the sheets, these places are primed. After drying, the primers are covered with a special adhesive composition. Subsequent work is performed not earlier than the composition dries.
- It is advisable to purchase dry mixtures closer to the beginning of the shelf life. Expired compositions are not recommended (fraught with serious consequences).
- The reinforcing tape is laid exactly in the middle of the seam.
- Do not add water to the drying plaster or putty mixture. After such an operation, the solution sets faster.
- Excess plaster gypsum mortar must not be thrown into the tank with the working composition.
- Plaster mixtures diluted with cold water.
- To plaster the joint reliably, the seam is filled with mortar, leading the spatula along the seam and making sure that there are no voids in the filling. Flows and sprays are removed immediately, since after setting they will be problematic to remove.
Information on how to plaster drywall is useful to back up with a visual demonstration. Videos will help in this.
Doing leveling gypsum plasterboard with your own hands is not difficult. Many types of decorative plasters can also be performed by beginners. If you wish, you can learn everything.
How to plaster GKL
GKL sheets are perhaps the best solution for cheap and quick surface leveling. They make it possible to assemble a wide variety of designs, including complex ones, that will be both functional and beautiful without any special problems and in a short time. However, they need a finish. Is it possible in this case to apply plaster on drywall and how to do it correctly? We will examine this issue in detail.
Putty or plaster
Formally, both materials are used to level surfaces. However, there are some nuances. Significant differences in composition make their scope different. Their main difference is the grain size of the binder. In plaster, it is larger, even in the finest-grained varieties. It is good for rough leveling the base. Easily covers even large defects and irregularities.
Putty lays in a thin layer, because it has a minimum grain size. With its help, finish alignment is performed when all significant flaws are already closed. Solutions can be distinguished even in appearance. In the plaster, large or small particles are necessarily present, the putty is a homogeneous paste. These differences should always be taken into account when deciding on the finishing of GCR.

What materials can be used
For subsequent plastering, it is desirable to choose moisture resistant sheets. Such drywall in the production process is treated with hydrophobic impregnation, as a result of which it acquires resistance to moisture. The plates can be distinguished by marking, green color and a higher price. Conventional material consists of cardboard and dry gypsum, which are destroyed by water. It is not practical to treat them with a wet mixture.
For work, a primer is required. Choose the option suitable for the particular case. The best solution is a deep penetration. Its use protects the base from getting wet, improves adhesion to it of finishing materials: glue, paint, etc., and also reduces their consumption.

Decorative mixtures used for plastering GCR, differ from the usual presence of some inclusions. Depending on their type, the compositions are divided into:
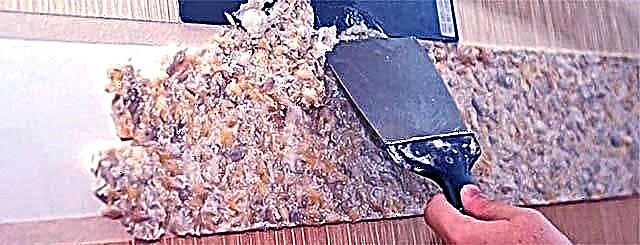
- Embossed or textured. Solutions with a highly viscous coarse structure. As a filler, they use pieces of mica, fibers, wood, mineral chips or small pebbles. As a result of application, a surface with a pronounced relief is obtained.
- Structural. They have a finely dispersed structure, which is obtained by adding quartz or marble chips. There are fine and medium-grained coatings. The first ones are almost flat, the second ones with a small relief.
- Venetian.They are made with the addition of slaked lime and small chips of marble. They have an almost uniform structure. Ready-made imitate marble or onyx surface. Painting with special pigments gives them the appearance of a precious metal. Multilayer and difficult to apply.
Training and Tools
The following materials and tools will be required to process drywall
- ready-made dry or pasty mixture,
- container for preparing dry formulations,
- primer,
- narrow and wide blade spatulas,
- painting grid,
- paint brush (preferably slightly different in length),
- construction knife
- grouting devices.

Finishing technology
There are universal points that must be observed regardless of the type of front trim.
The edges of the drywall walls must be cut at an angle of 45 degrees, and a right angle is formed at the intersections of the sheets. For chamfering, small planers are sometimes used to help prepare the material before attaching it to the wall. Then the dust is removed with brushes or brushes, and the chamfers themselves are primed (this helps to eliminate cracking of the seams). To knead the composition, it is necessary to use cold water.

The seams of drywall sheets must be filled with putty and leveled along the entire length. For this, it is recommended to use narrow spatulas.
Then the solution is closed with a reinforcing mesh, which needs to be pressed a little. Then the grid must be covered completely with an additional layer of putty. A spatula with a wide blade is already used here.

Drywall processing at the joints is as follows:
- chamfer at the edges
- primed the treated area,
- grease it with putty,
- covered with reinforcing mesh
- use the final layer (for a flat seam it is recommended to use a mesh)
- it ends with mashing the coating with fine graters.

Under the wallpaper
The imitation of wallpapering is created with cellulose-based mixtures. Various fillers are added to it: silk, cotton, acrylic. Also in the composition of liquid wallpaper includes pigments and some other components. Such mixtures are delivered in bags; they are slightly moistened with water before use. The walls need to be primed, the material itself is leveled with a spatula after application.


Rothband
This is really a quality composition of German production. But it is also very important for him to have a good surface preparation with the help of a deeply penetrating soil, which improves adhesion to the applied material. No less significant is the fact that the primer interferes with the impregnation of drywall sheets with water, which inevitably stands out from any plaster.
When applying the primer mixture, any gaps are unacceptable, and the joints are glued with tapes (serpentines), and then coated with special reinforcing compounds. On a dry surface, such lines are overwritten, removing small deformations and flows.
To work with the "Rotband" a spatula with a blade of 30 cm or more is recommended, it is held at an angle of 30-40 degrees. Strong pressure is contraindicated: it will provoke the appearance of waves.
If the defects of the initial surface are significant, they work in two steps: 0.3-0.5 cm for each. The final composition is applied at a maximum of 0.1 cm, the most insignificant deviations from the even layer are unacceptable. After drying (taking 24-48 hours), the plastered walls will turn out to be perfectly white.
Decorative plaster
Decorative plaster can also be applied to the surface of drywall. The Venetian version of the coating is distinguished by a combination of various colors and a glossy outer layer. In addition to fully prepared mixtures, there are also hand-made ones: they are prepared by adding various colors to the universal gypsum material. Most often, the first layer is made white, setting the future relief, the second determines the texture and color. The third layer enhances tonality, makes single segments lighter or darker.

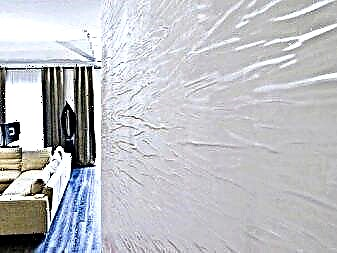
The textured type of plaster is conditionally allocated, because almost any mixture allows you to create an elegant relief. But there are already familiar options for professionals like the bark beetle. Depending on personal needs and taste, you can choose abstract compositions and geometric shapes. Any builder, at least minimally experienced, will be able to make both a duplicate pattern and a chaotic image.
The tools used are diverse: not only spatulas, but also trowels, sponges, specially ordered dies, coarse wire brushes and the like.


Plastering the arch also has its own characteristics. First of all, the perimeter is thoroughly cleaned, the same manipulation is carried out with joints. Further ends are polished, which protrude at least slightly beyond the contours of the arch. Then the drywall is thoroughly saturated with a primer, the protrusions are covered with a perforated corner. Then a reinforcing layer is used - this is the end of the preparation.