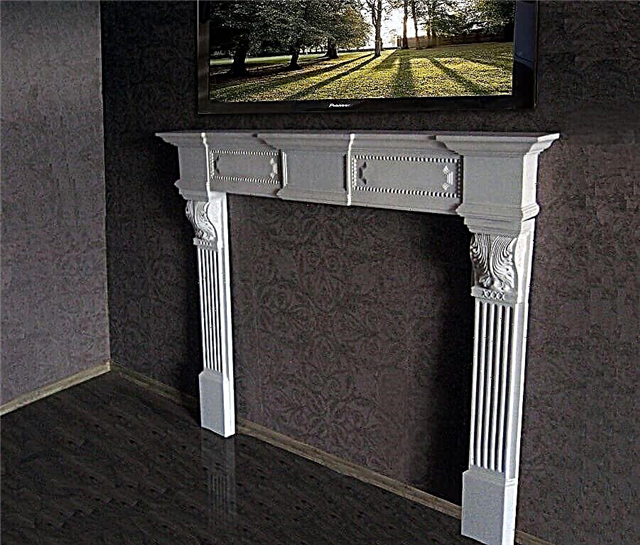
Friends, as promised, I want to share with you information on how to quickly decorate a false fireplace. I am writing mainly for those who have recently become interested in the theme of decor of furniture and interior items and probably have not yet held brushes in their hands. But, probably, experienced masters will find useful information for themselves in this article :)
What I got in this photo:

So, we need:
1. The blank that we will decorate.
2. Stain water "Ebony" for the base, "Oak for countertops.
3. Vernensky Eco-paint Shabby Fog (for seams).
4. Vernensky Eco-paint Perfect Porcelain (for coloring).
5. Vernensky mastic thin (for brickwork).
6. Vernensky Texture “Lime”, medium granules (for masonry).
7. Vernensky Thickener (for decor of seams).
8. Patchwork wax (top coat. Scissors).
9. Vernensky Varnish matte (podium finish).
10. Masking tape or stencil on plastic.
11. Brushes N25, 30, grinding sand.
1. To start, I ordered a blank according to my size. I looked for analogues that I like on the Internet. Then she made a small full-size drawing on paper and attached the parts in the place of the alleged installation of the fireplace under the TV to the mounting tape. I was convinced that the design will look good. Then I ordered a blank with a niche for lighting. The carpenter suggested the idea :) The fireplace top is made of solid pine. This is a board with a "living edge", where there is no carpentry cut along the edge. The carpenter just removed the bark, polished the surface a little and smoothed the protruding edges. It turned out very beautifully!
2. Since my fireplace will be with vintage scuffs, we cover all details except the wall and countertop with a dark water stain (black Ebony or brown Rosewood). An alternative is to rub the chalk or eco-paint of the desired shade into the surface with a slightly damp sponge until the desired saturated shade is obtained. This shade will later be visible in scuffs. By the way, the second method of tinting is preferable, because subsequent migration of stain to paint and its color change are excluded. For such tinting, Vernenskaya Shabby or Perfect paint, the color Chocolate, Caviar and others, is suitable.
3. Next, we putty with Verna mastic possible chips, defects. I putty the screws in the upper part of the fireplace, so that the surface becomes smooth. Dry the mastic. Probably, after drying, the mastic will settle and recesses will appear on the surface, in this case, add more mastics, smooth the surface with a spatula, dry and sand until smooth.
4. Next, I paint the inner wall of the fireplace with Vernensky paint Shabby color Fog. This color will then be visible at the seams of the brickwork, which we will imitate using masking tape, Vernensky mastic and Texture. You can paint with a natural bristle brush in thick strokes so that the seams are textured. Dry the paint.
5. Next, we mark the future brickwork with adhesive tape. To do this, take a wide masking tape and tear off narrow strips from it. The edge of the stripes will be slightly or very uneven, but this is good, because our brickwork will be old. I got a very rough edge. We make markings using a ruler and stick on horizontal stripes of adhesive tape first, then transverse (on top of horizontal) in a checkerboard pattern. We protect with masking tape all parts of the workpiece where the mastic should not get.
Note: If you do not like this option, you can purchase / order a stencil with brick or masonry and use it.
6. You can begin to simulate masonry!
At first I started to imitate the bricks only with the help of the Vernensky Texture Lime, medium granules. I wanted them to be textured and rough. But in the process, I realized that the pebbles are not voluminous enough.
Then I began to apply thin and thin layer of Verna mastic with the first and rather thick layer, then, without waiting for drying, from above the Texture “Lime”. It is convenient to apply mastic with a metal palette knife or rubber spatula.
Important! Apply the mastic and Texture in rows, for example 2-3 rows and immediately remove the adhesive tape until the mastic has dried. Next, put the mastic on the next 2-3 rows and so on until the end, until the entire wall is framed.
7. Until the bricks are completely dry, we remove the excess mastic between the bricks at the seams with a damp cloth, and we also smooth out the protruding edges of the bricks from edge to center with a spatula, so that the masonry looks more neat. After the “masonry” has dried, I mixed the Shabby Fog paint with the Vernensky Thickener and rather densely painted the seams with a round brush of natural bristle, trying to imitate the grouting of the seams.
8. Before painting the wooden parts of the fireplace, selectively rub the protruding parts of the wax candles with strong pressure and remove the wax with a stiff brush from natural bristles. You can do the same thing with Vernensky transparent wax or cosmetic vaseline by typing it on a stiff bristle brush and selectively applying it to the edges of the product. Where wax or petroleum jelly is applied to the wood, the paint will lie poorly and will easily sand off in the future when creating scuffs.
9. Next, we process the countertop of the future fireplace. During the preparation of the fireplace blank, its countertop was cast with a hard metal brush to reveal the texture of the wood. You can do it yourself at home, for this, soft fibers are combed with a brush along the wood pattern, so that recesses appear. Next, sand it with sandpaper between the fibers and paint the tabletop with a water stain of the color “Oak” with a brush of natural bristles. When the stain dries, we protect the countertop with wax. I choose for this purpose Patchwork wax with linseed oil, because It has antiseptic properties and does not have a strong odor, like the classic Patchwork wax. To protect the countertops, Vernensky transparent wax is also suitable; it smells very nice of coconut.
To cover the tabletop with wax, we collect a little wax on the gauze and apply it with a thin layer, rubbing it well into the surface. In this way we protect the countertop from above and below. Waxing the countertops before painting the rest of the fireplace will allow us to quickly erase the paint if we accidentally stain the countertop. It is advisable to leave the wax overnight and then polish the surface with a hard waffle towel in a circular motion until a shine appears.
After waxing and polishing, the fireplace countertop has a silky surface that is pleasant to the touch! At the same time, the tree is well protected without loss of natural beauty :) I recommend this method of surface treatment if you like natural wood products.
10. In the center of the upper part on the “Moment” adhesive gel, we glued a volume molding, making markings with a ruler. I have this plastic decor element.
11. We proceed to coloring the remaining parts of the fireplace. I decided not to paint the upper part of the podium, but simply covered it with 2 layers of Verna matte varnish, dried it and then protected it with masking tape.
To color the columns and the upper part of the fireplace, I chose the white paint of the Vernensky manufactory Perfect, Porcelain. This paint does not need to be protected with varnish or wax, which is very convenient.
For work, I chose a synthetic thick brush. It is necessary to paint not with a dense layer, leaving glimpses and "lack of color". After applying the first layer, apply the second layer of paint, achieving natural smooth transitions of color, without obvious traces of the brush. In this way we paint all parts of the fireplace, including plastic molding. We paint the molding so as to prevent clots and smudges of the paint inside.
12. Then, with fine-grained emery paper, we pass along the edges of the product where the wax was applied, and along the protruding parts of the molding to sand the paint and create beautiful scuffs. How much your fireplace will be old, you decide :)
And finally, we decorate the fireplace with decorative elements of your choice: candles, logs, decorative wreaths. By the way, you can easily make such a wreath yourself :) I made the wreath myself in half an hour.
You can turn on the backlight and enjoy the feeling of comfort with a cup of your favorite tea and a book :)
By the way, I decorated my fireplace in 2 days, spending about 4 hours a day.
Types and sizes of raised fireplaces
All existing false-mines can be divided according to several criteria.
p, blockquote 3,0,0,0,0,0 ->
From the point of view of practicality, three types of fireplaces can be distinguished:
p, blockquote 4,0,0,0,0,0 ->
- decorative. These models are made only to decorate the room, and cannot perform any other functions. When creating them, inexpensive and not particularly durable materials are usually used, for example, cardboard or foam,
- semi-functional. For this variety, more durable materials are used: MDF, drywall, etc. In this case, the fireplace can be used as an additional shelf for storing decorative trifles, or a secret niche for built-in cabinets, a bar or a safe,
- functional. Durable materials (brick, wood, etc.) used in their manufacture allow not only to use a false fireplace as a full-fledged shelf, but also to use it to heat the room. Of course, it is impossible to ignite the logs in it, but it’s quite possible to place a heater inside, or a heating radiator.

p, blockquote 5,0,0,0,0 ->
You can also consider fireplaces, only from an aesthetic point of view. In this case, their classification will look somewhat different:
p, blockquote 6.0,0,0,0,0 ->
- conditional. There is no fireplace as such, there is its image on the wall, or the nominal designation of the boundaries of the hearth, for example, using decorative moldings,
- standard. The most popular variety. In this case, all the necessary components are present: a mantelpiece, a niche for firewood, protruding side walls. Decor can be varied: painting, decoration with wood, wallpaper or “brick-like”,

- as realistic as possible. In this case, preference is given to natural materials. At the same time, real proportions and dimensions are observed so that the finished fireplace looks extremely real.


A conventional fireplace is unlikely to be functional, but a standard or realistic one can be used in any way.
p, blockquote 7,0,0,0,0 ->
In addition, false fireplaces can be divided, starting from their shape and size:
p, blockquote 8,0,0,0,0 ->
- minicamines. This species is very rarely a separate independent decoration. Usually they are made part of a decorative composition, such as Christmas,

- angular. Suitable for small rooms, as they take up less space. Moreover, due to fastening to two walls at once, they are more stable and reliable,
- direct. They can occupy up to a third of the wall (dimensions and proportions are close to real fireplaces). Great for organizing photo shoots and decorating rooms.

It should also be understood that all types of fireplace portals need to be considered also in terms of durability. In this case, they can be:
p, blockquote 10,0,0,0,0 ->
- disposable. Most often, such decor is made for the New Year holidays and Christmas. This form of fireplace is made of short-lived and inexpensive materials (paper, cardboard, boxes, etc.). After the festive events, the craft is sent to the scrap,
- folding or portable. They can be made both from cardboard, and from boards or MDF. Installed if necessary,
- stationary. Rigidly attached to the wall and floor on an ongoing basis. They are an integral part of the interior of the living room, bedroom or nursery.

p, blockquote 11,0,0,0,0 ->
Before embarking on the manufacture of a fake fireplace, you need to clearly think about the final result. The construction of some types of false fireplaces requires a significant investment of finance and time.
p, blockquote 12,0,0,0,0 ->
To avoid errors, you must first create a detailed sketch indicating the dimensions.
p, blockquote 13,0,0,0,0 ->
For clarity, you can make a "pattern" of old newspapers or wallpaper.
Such an approach will help to “see” how the finished design will fit into the interior. At this stage, it will be easier to adjust the dimensions and appearance of the craft.
p, blockquote 15,0,0,0,0 ->
Out of the boxes
The easiest and budget option. Such a decorative fireplace portal can be done in one day, spending only on PVA glue and finishing materials.
p, blockquote 17,0,0,0,0 - ->

p, blockquote 18,0,0,0,0 ->
New Year's fireplace
Any boxes are suitable for manufacturing: from household appliances, building materials, food, office paper (A4), etc. The final form of the finished product will depend on the number of boxes, their shape and size.
p, blockquote 19,0,0,0,0 ->
For manufacturing you will need:
p, blockquote 20,0,0,0,0 ->
- boxes
- glue (PVA or carpentry),
- stationery knife,
- ruler
- pencil,
- Scotch,
- a press (a stack of books or something heavy, but compact),
- level.
For the first time, it is better to choose models of the simplest forms, without arches and complex elements. But if you have confidence in your own abilities, you can swipe at an exclusive design.
p, blockquote 21,0,0,0,0 ->

p, blockquote 22,0,0,0,0 ->
Step-by-step instruction
Preliminary drawing. It should indicate all sizes, places of bends and glues. To facilitate the operation of the box, it is better to number and on the drawing note where which should be.
p, blockquote 23,0,0,0,0 ->
First step
p, blockquote 24,0,0,0,0 ->
Making side posts. They can be made of one narrow but long box, or of several glued together. Here you need to understand that the weight of the entire structure will be supported on these columns.
p, blockquote 25,0,0,0,0 ->
If a false fireplace will carry only a decorative role, then such columns will be enough. If there is anything standing on the mantelpiece (massive figurines, candles, a fruit basket, etc.), then the posts should be strengthened with an additional layer of cardboard, slats or other materials.
p, blockquote 26,0,0,0,0 ->
Second step
p, blockquote 28,0,0,0,0 ->
Base construction. If the pseudo-fireplace will be attached to the wall (using masking tape, or in another way), then one or more flat boxes can be used as the basis. In the absence of boxes of the desired shape and size, a piece of polystyrene with a thickness of at least 10 cm can act as the basis.
p, blockquote 29,0,0,0,0 ->
In the case when the fireplace cannot be firmly attached to the wall or floor, it is better to place a counterweight (load) inside the base. A stack of old magazines or several books can play its role. So the product will be more stable.
p, blockquote 30,0,0,0,0 ->
p, blockquote 31,0,0,0,0 ->
p, blockquote 33,0,0,0,0 ->
Third step
p, blockquote 34,0,0,0,0 ->
Fastening columns to the base. It is not enough to attach the side walls to the bottom with PVA glue. For additional rigidity, all joints need to be glued with a wide adhesive tape. In this case, you should use a level so that the posts are upright.
p, blockquote 35,0,0,0,0 ->
More reliable adhesion can be achieved if the columns are fully pressurized until the columns have completely dried (a heavy object of appropriate size should be placed inside the column box, thereby pressing the column to the base).
p, blockquote 36,0,0,0,0 ->
Fourth step
p, blockquote 38,0,0,0,0 ->
Mounting the back wall. It is not necessary for her to take a full box. A simple sheet of cardboard is enough. To reduce the consumption of materials, the box can be deployed (but you need to make sure that the back side is flat without bends).
p, blockquote 39,0,0,0,0 ->
The back wall is glued to the side columns using PVA or a glue gun. For stronger fixation, the joints can be fixed with a wide adhesive tape.
p, blockquote 40,0,0,0,0 ->
Fifth step
p, blockquote 41,0,0,0,0 ->
Making the facade. It’s easier to do fake jams without an arch. In this case, the facade will require only one narrow and long box for the upper part (or several smaller boxes fastened together).
p, blockquote 42,0,0,0,0 ->
From a similar package, you can make the lower part of the facade, but the fireplace grate in this part looks better.
p, blockquote 43,0,0,0,0 ->

p, blockquote 44,0,0,0,0 ->
When making an arch hole under the hearth, it is better to take a solid sheet of thick cardboard. For example, the front of the box is from a large plasma TV.
p, blockquote 45,0,0,0,0 ->
There are three ways to draw a smooth circle for an arch:
p, blockquote 46,0,0,0,0 ->
- with the help of a large compass,
- circle a round object of the desired radius (a basin or a large pan),
- using a rope. A pencil is attached to it from one end, and a nail or needle from the other.Using a nail, the edge of the rope is fixed in the right place and a cut line is drawn with a pencil (it is better to pre-train).
A circle is needed only in the upper part, the lower parts are marked with a ruler. The slot is made with a clerical knife.
p, blockquote 47,0,0,0,0 ->
If you need a voluminous arched facade, then two identical sheets of cardboard with arched slots are made. They are interconnected by a strip of cardboard of the desired width (when cutting the connecting strip, you must take into account the allowance for bending and gluing).
p, blockquote 49,0,0,0,0 ->
The facade is attached to the side walls in the same way as the rear.
p, blockquote 50,0,0,0,0 ->

p, blockquote 51,0,0,0,0 ->
Sixth step
p, blockquote 52,0,0,0,0 ->
Fireplace cover. The design of the top plate will directly depend on the required functionality.
p, blockquote 53,0,0,0,0 ->
If on the fireplace, except for the New Year’s decor of garlands and cones, nothing will be placed, then for the manufacture of the lid an ordinary hollow box will be enough.
p, blockquote 54,0,0,0,0 ->
If photo frames, candles and light decor items will be stored on it, then it is better to put stiffeners inside the box. To do this, trim the cardboard or sheets of thick paper you need to fold “accordion” and arrange horizontally inside.
p, blockquote 55,0,0,0,0 ->
To store more massive things, it is better to use a sheet of polystyrene, plywood or drywall as a mantelpiece. But in this case, you need to pay attention to the mass of finished crafts. The model of the fireplace from the boxes can not be called a solid and reliable design, it can develop from a heavy load.
p, blockquote 57,0,0,0,0 ->
Seventh step
p, blockquote 58,0,0,0,0 ->
Dressing. Decorations for a raised fireplace from the boxes should be as light as possible. Best for this purpose are wallpaper, paints, polyurethane moldings or polystyrene false bricks.
p, blockquote 59,0,0,0,0 ->
From paper or cardboard
It is not always possible to cut a fireplace out of a large box, if there are no suitable consumables at hand, you need to turn on your imagination. There are many options for making false fireplaces from improvised tools at minimal cost.
p, blockquote 73,0,0,0,0 ->
A small paper false fireplace will revive the office before the New Year. It can be installed directly on the desktop, in addition to a small artificial Christmas tree or a bouquet of needles.
p, blockquote 74,0,0,0,0 ->
A paper fireplace should be miniature. Large-scale crafts will not hold the desired shape. Typically, this decor is not placed on the floor, but on a table or window sill. False fireplaces made of thick paper or thin cardboard can also be excellent furniture for a dollhouse.
p, blockquote 76,0,0,0,0 ->
Larger models are best made from corrugated cardboard or dense materials that hold the shape.
p, blockquote 77,0,0,0,0 ->
Necessary materials
The list of materials in this case is minimal:
p, blockquote 83,0,0,0,0 ->
- liked the design from the Internet. But here it must be borne in mind that when choosing a low-quality picture or when using a large scale, the picture may "float". In this case, such a sketch can only be used as a draft blank, which will have to be additionally painted and decorated,
- scissors,
- glue,
- paper or cardboard (if the fireplace is quite large).
In addition, decoration materials may be required.
p, blockquote 84,0,0,0,0 ->
From cardboard
Their cardboard can reproduce any fireplace model. The main thing is that the material is sufficiently dense.
p, blockquote 90,0,0,0,0 ->
The list of necessary tools and materials may vary depending on the chosen fireplace model, but the basic set remains unchanged:
p, blockquote 91,0,0,0,0 ->
- stationery knife,
- glue,
- pencil,
- ruler
- cardboard,
- Scotch,
- materials for decoration.
Cardboard fireplace layout is compiled and thought out in advance. Based on the selected design and size, the required amount of materials is calculated.
p, blockquote 93,0,0,0,0 ->
Next, the pattern (taking into account the scale) is applied to the cardboard. The closer the parts are to each other, the less waste will remain.
p, blockquote 94,0,0,0,0 ->

p, blockquote 95,0,0,0,0 ->
Details are cut out and glued together. Additionally, all joints are fastened with tape. For greater reliability in areas with the highest load, cardboard can be glued in several layers, or build a frame of racks.
p, blockquote 96,0,0,0,0 ->
Material does not have to be bought - excellent blanks for parts can come out of the box from the TV or refrigerator. It is enough to carefully deploy and align them.
p, blockquote 97,0,0,0,0 ->
But here you need to consider the selected type of finish. So, to make a white fireplace from the boxes will be much more difficult than with the finish "wood" or "brick". A bright pattern may appear through a layer of light paint or white paper.
p, blockquote 98,0,0,0,0 ->
In order not to be tormented later with the question of how to glue the fireplace out of the boxes in such a way that advertising signs do not appear - it is better to place such cardboard on the inside.
p, blockquote 99,0,0,0,0 ->

p, blockquote 100,0,0,0,0 ->
From polystyrene foam
For the manufacture of a fireplace, it is better to use transportation foam. It is stronger and crumbles less. The problem is that sheets of such foam are more expensive than usual. And when using free balances from packaging (household appliances, etc.), the blanks have a complex shape, which is difficult to work with.
p, blockquote 101,0,0,0,0 ->
Important Points When Working With Styrofoam
To use for cutting polystyrene, you need exactly a hacksaw for metal (with small teeth). When using a conventional carpentry hacksaw, the edges will crumble, and the details will look very messy.
p, blockquote 102,0,0,0,0 ->
With a knife, this material is also not worth cutting. With such a large thickness, there is a high probability that the sheet will crack during the cutting process. It will be impossible to use a blank with such a marriage.
p, blockquote 103,0,0,0,0 ->
Option: cut through only the upper layer, and break off the bottom along the cut line - also does not work. A flat fault will not work, and the sheet will go to the scrap.
p, blockquote 104,0,0,0,0 ->
When heated, polystyrene and polystyrene can release toxic substances into the air that are harmful to health. Therefore, false stoves made of these materials should not come into contact with heating elements.
That is, inside the hearth it is impossible to install heaters, radiators, candles, etc. If you need an imitation of fire in a fireplace, then it is either drawn (with your own hands or a finished image is taken), or light elements are used that do not heat up during operation (diode tape, etc.).
p, blockquote 106,0,0,0,0 ->
A false fireplace, which is planned to be used only for decorative purposes, is usually made no more than 30 cm deep. If a mantelpiece will be used to store various trifles, and inside there will be imitation of firewood or other decor, then the total depth of the product can reach half a meter.
p, blockquote 107,0,0,0,0 ->

p, blockquote 108,0,0,0,0 ->
Also, when working with these materials, special attention should be paid to the selection of glue and putty. The surface of the foam is quite smooth, and its structure practically does not absorb such compounds. Therefore, ordinary PVA and similar types of glue will not give reliable adhesion of parts.
p, blockquote 109,0,0,0,0 ->
On the putty and adhesive composition it should be indicated that they are designed specifically for working with polystyrene and foam.
Styrofoam based fireplace
Although polystyrene is an inexpensive building material, its price per square meter ranges from 250 to 400 rubles. (with a thickness of 10 cm). With such prices, the final cost of a false fireplace can reach several thousand.
p, blockquote 123,0,0,0,0 ->
You can reduce financial costs by half with a simple trick. Pre-made skeleton from improvised means.
p, blockquote 124,0,0,0,0 ->
The most budgetary option for the base is ordinary cardboard boxes. Of these, pseudo-gluing is glued, as in MK above, and it is already glued with cut foam sheets. In this case, it is not necessary to spend money on ten-centimeter sheets; it is enough to take a foam plastic of minimum thickness (1-2 cm).
p, blockquote 126,0,0,0,0 ->
This design will be more reliable than just a stove of boxes, and the look will be more even and aesthetic.
p, blockquote 127,0,0,0,0 ->
Then it remains only to putty and decorate the finished fireplace.
p, blockquote 128,0,0,0,0 ->

p, blockquote 129,0,0,0,0 ->
Drywall
Drywall tricks are usually made during the repair process in the form of stationary false fireplaces. Such work requires skills to work with this material and a minimum set of tools.
p, blockquote 130,0,0,0,0 ->
Before proceeding to the procurement of materials, it is necessary to decide on the final finish of the pseudo-fireplace and its functionality. This will affect the type of drywall you need.
p, blockquote 131,0,0,0,0 ->

p, blockquote 132,0,0,0,0 ->
If the fireplace will carry out only a decorative function, then ordinary plasterboard (gray) is enough. But here you need to consider the final finish.
p, blockquote 133,0,0,0,0 ->
Conventional drywall can withstand painting or pasting with decorative foam brick, but when tiled, it is better to take moisture-resistant (green) sheets.
p, blockquote 134,0,0,0,0 ->
If, inside the decorative portal, a heating radiator or bio-fireplace is hidden, then it is better to take fireproof (pink) drywall. It will reduce the risk of fire.
p, blockquote 135,0,0,0,0 ->
After working out the drawing and calculating the finished dimensions, you can proceed to the procurement of materials.
p, blockquote 136,0,0,0,0 ->

p, blockquote 137,0,0,0,0 ->
To make a false fireplace from drywall you will need:
p, blockquote 138,0,0,0,0 ->
- drywall
- aluminum profile,
- wood screws or dowel-nails (for fixing the structure to the wall),
- putty,
- primer,
- glue,
- finishing materials (the list may vary depending on the chosen type of final decor),
- roulette,
- level,
- ruler
- pencil,
- stationery knife (for cutting drywall),
- a grinder or hacksaw for metal (for working with a profile),
- wet towel or sponge (if the hearth will have an arched design).
It should be borne in mind that the design of a drywall fireplace is usually more ambitious than from a box or cardboard. Usually this is not a modest decorative design, but a practically functional 3D fireplace, quite dimensional and practical.
p, blockquote 139,0,0,0,0 ->
The reliability of the materials used in the manufacture allows you to use an artificial fireplace as a stand for the TV, or to equip hidden boxes for storing various trifles inside the side columns.
One of the most popular options: a false fireplace with a chimney, in the niche of which there is a TV. Such a solution is usually implemented in the interior of a living room or bedroom.
p, blockquote 141,0,0,0,0 ->
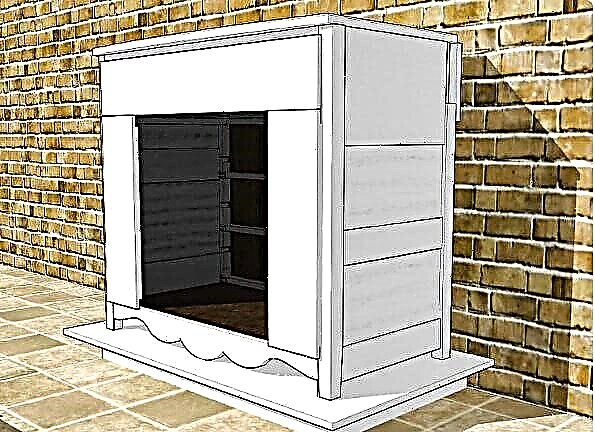
Below is a drawing of a false fireplace with dimensions that are suitable for a standard room of 18 square meters.
p, blockquote 142,0,0,0,0 ->

p, blockquote 143,0,0,0,0 ->
The master class on the manufacture of such a fireplace includes the following items:
p, blockquote 144,0,0,0,0 ->
- Calculation of the amount of required materials. Depending on the diagonal of the TV and the individual nuances of the design, the amount of consumables may vary.
- Cutting materials according to the drawing:
- the profile is sawn by a grinder or a hacksaw for metal,
- drywall is cut with a clerical knife (the top layer of cardboard is cut, and the sheet breaks into pieces along the cut line).
- Preparing a place for installation (if in the niche for the fireplace from the drywall there will be a TV, heater or backlight, sockets, brackets, etc. are mounted).
- Assembly of aluminum construction. At this stage, the drywall frame for the fireplace is attached to the floor and wall. Carrying out this work with your own hands, you should make sure that the screws do not break through the hidden communications (wires, pipes, etc.).

- Covering the frame with drywall.
- Corner alignment with a countersunk.
- Putty. Do not immediately apply a thick layer. It’s better to make it a little thinner, making sure that each previous coat is completely dry before applying the next.
- Finishing

Separately, it is worthwhile to dwell on the plasterboard facing of curved surfaces. If the upper part of the focus is made in the form of an arch, then GKL need to bend. There are three ways to do this:
p, blockquote 145,0,0,0,0 ->
- buy a special flexible drywall. Different manufacturers produce various variations of this material, differing in cost and maximum permissible bending radius,
- dry bend. This method is only suitable for lesions with a large radius of curvature (light arched bend). In this case, the sheet is simply screwed to the frame from the profile. To prevent cracking, the cardboard layer can be slightly moistened on both sides.
- bend wet. To do this, go through the cardboard from the inside of the sheet (the one into which it will be bent) with a needle roller (pierce the cardboard coating). Then they put a wet towel on it (it should not leak from it, but at the same time it should be well wet, and not slightly moist) for 5-10 minutes. Or you can moisten it several times with a wet sponge - so that the surface ceases to absorb moisture and begins to shine (the procedure will take the same 5-10 minutes). After that, the sheet is bent along the desired radius.


Next, the resulting arch from the GCR can be immediately attached to the profile, or fixed with clamps for a day on the template.
p, blockquote 146,0,0,0,0 ->
If you build a fireplace in drywall, you can get a very natural effect, almost indistinguishable from the original.
p, blockquote 147,0,0,0,0 ->

p, blockquote 148,0,0,0,0 ->
It should be noted that we are talking about an electric fireplace, or a bio-fireplace with a completely closed flame. Do not allow open flame to come into contact with drywall.
p, blockquote 149,0,0,0,0 ->

p, blockquote 150,0,0,0,0 ->
From plywood, chipboard
This material is perfect for embodying any design: from classic to modern and minimalism.
p, blockquote 151,1,0,0,0 ->
The design is reliable, durable and almost completely natural. Therefore, it is suitable for use in children’s rooms and apartments for allergy sufferers.
p, blockquote 152,0,0,0,0 ->
The list of materials and tools for making a raised fireplace from chipboard is exactly the same as when working with drywall. Differences are observed only in two points: the drywall itself is replaced with sheets of plywood or chipboard, and the clerical knife is replaced with an electric jigsaw. The rest of the set remains unchanged.
p, blockquote 153,0,0,0,0 ->
In order to avoid mistakes during cutting, you can order a cut of materials when buying sheets of chipboard. This will facilitate not only the assembly of the fireplace, but also the process of delivery and lifting of blanks.
First build option
If the thickness of the sheets is large enough, then you can make a false fireplace without a frame, securing the workpiece joint to joint. The drawing shows the design and dimensions, and in the video below it - step-by-step assembly instructions in this way.
p, blockquote 155,0,0,0,0 ->

p, blockquote 156,0,0,0,0 ->
p, blockquote 157,0,0,0,0 ->
It is worth noting that with such fastening of parts, one must act very carefully. There is a high probability of occurrence of cracks in the workpieces if the holes for the fasteners are drilled crookedly.
p, blockquote 158,0,0,0,0 ->
The second manufacturing option
This assembly method can be considered classic. The design is assembled on a frame, by analogy with a GKL fireplace.
p, blockquote 159,0,0,0,0 ->
- Initially, the frame is prepared. It can be assembled from aluminum profiles, or from a wooden beam.
- Then the resulting structure is sheathed cut sheets of plywood. The corners are aligned, the surface is plastered and decorated.
Since chipboard and plywood are much more difficult to bend than drywall, when working with these materials it is better to choose projects with straight lines. It is worthwhile to give preference to complex forms with a large number of curved elements only in case of extensive experience working with particleboard and plywood.
p, blockquote 160,0,0,0,0 ->

p, blockquote 161,0,0,0,0 ->
From plaster
The popularity of this material has not abated over the centuries. A huge number of pluses, more than covering an insignificant number of minuses, has long and firmly put gypsum into the leaders of the list of materials for making false fireplaces.
p, blockquote 162,0,0,0,0 ->
By the way, gypsum is fireproof and is suitable not only for creating imitations, but also for the manufacture of high-grade open fires.
p, blockquote 163,0,0,0,0 ->
Due to the significant weight of the finished structure and the rather laborious manufacturing process, such portals are made only in the form of stationary, durable structures.
p, blockquote 164,0,0,0,0 ->
There are two ways to make false plaster from plaster: monolithic and on the frame. The first option is more reliable and looks more solid, but it requires a lot of time and money to manufacture.You can buy a ready-made gypsum fireplace, but such products are quite expensive. It is much cheaper to make a gypsum facade with your own hands.
p, blockquote 165,0,0,0,0 ->
Monolithic
This option requires a serious investment of time and effort. In this case, it is desirable to have a separate well-ventilated room for casting individual parts and a furnace for drying them.
p, blockquote 166,0,0,0,0 ->

p, blockquote 167,0,0,0,0 ->
In addition, you will need:
p, blockquote 168,0,0,0,0 ->
- Smooth surface. It can be a table or a workbench, the main thing is that there is no skew in the horizontal plane (checked by level),
- dense polyethylene. For covering all surfaces. There will be a lot of dust in the manufacturing process,
- molds for filling. You can buy them (any options and sizes are made to order) or make them yourself,
- soap. They are coated with molds before pouring so that the parts can be easier to remove after solidification,
- container for diluting gypsum mixture,
- tools for drawing and leveling (brushes, spatulas, etc.),
- gypsum,
- water,
- sandpaper or grinder,
- knife,
- pencil,
- roulette,
- level,
- oven (hair dryer or heater is not suitable, if there is no oven, it is better to leave the parts to dry naturally).

p, blockquote 169,0,0,0,0 ->
There are several basic rules that should be followed when working with plaster:
p, blockquote 170,0,0,0,0 ->
- Do not fill in volumetric parts immediately. Such elements are filled with layers. The thickness of each layer should be no more than 1 cm. Each new tier is poured only after the previous one has solidified.
- during the pouring process it is necessary to ensure that no voids and air bubbles remain inside the layer. Small forms can be shaken several times to remove cavities. On large-scale details should be walked with a needle roller,
- if the form is made of soft material (silicone, etc.), it needs external support. During drying, the workpiece may deform under its own weight,
- the temperature in the oven should be at least 160 ° C. Drying time depends on the size of the part, but not less than one hour. With natural drying, each element should dry for at least 24 hours.
After learning the rules, you can begin the process of making the mixture. One kilogram of gypsum can account for 0.5 to 0.7 liters of water. A thick composition is used to fill in individual layers of massive elements (columns, foundations, etc.).
p, blockquote 171,0,0,0,0 ->
A more fluid solution is made for the manufacture of small parts, elements of complex shape, or for coating cracks and joints.
p, blockquote 172,0,0,0,0 ->
When working with gypsum, it should be borne in mind that the finished mixture sets quite quickly. Depending on the density of the composition, the entire pouring work takes from 30 minutes to an hour.
p, blockquote 173,0,0,0,0 ->
By adding a small amount of PVA glue to the mixture, you can make the composition more elastic. Such a solution will harden a little longer.
Stages of work on a monolithic plaster fireplace:
p, blockquote 175,0,0,0,0 ->
- Drawing up a drawing.
- The amount of necessary materials is calculated.
- Manufactured (or bought) fill forms.
- A work surface and a place to dry the workpieces are prepared.
- Forms are smeared with soap.
- The gypsum mortar is mixed.
- Forms are poured in layers and sent to dry.
- Finished parts are sanded with sandpaper.
- Individual elements are assembled into a single structure with glue and screws.
- Self-tapping hats, seams and small blemishes are sealed with a liquid gypsum mortar and sanded after drying.
- The finished design is decorated in the selected way.

p, blockquote 176,0,0,0,0 ->
If you plan to use a home gypsum fireplace to heat the room, then before installing it, you should take care of preparing sockets and wiring for the heater.
p, blockquote 177,0,0,0,0 ->
On frame
When choosing raw materials for the manufacture of the frame, it should be remembered that gypsum is a rather heavy material. A finished fireplace can weigh tens and hundreds of kilograms. Therefore, the frame of cardboard boxes or polystyrene is not suitable - it will fold under such a weight.
p, blockquote 178,0,0,0,0 ->
The base of: can withstand such a load:
p, blockquote 179,0,0,0,0 ->
- metalwork, sheathed with drywall, particleboard or other wood materials (but with such a basis the characteristics of fire resistance will drop sharply),
- bricks. Such a tandem will have very high strength and heat resistance, but the weight of such a design will be very significant. If you choose this option, you need to check the strength of the beams and floors before starting the construction of the fireplace,
- lightweight concrete blocks (from gas silicate, expanded clay, etc.). Such a frame in its characteristics is not inferior to a brick base, but the weight is 2-3 times less. True, the cost of such a skeleton will be significantly higher than a brick.
All three methods of building the foundation are common, but the most popular option is the one with a frame made of aluminum profiles and drywall.
p, blockquote 180,0,0,0,0 ->

p, blockquote 181,0,0,0,0 ->
From old furniture
Making a fake fireplace from an old chest of drawers, a cabinet or a bedside table is a wonderful way to give a second life to outdated furniture. This manufacturing method has several advantages at once:
p, blockquote 189,0,0,0,0 ->
- cost savings
- environmental conservation (from excess garbage),
- minimum effort and time (no need to run around the shops in search of the right materials).
The only drawback is that the size of the false fireplace will be limited by the dimensions of the furniture.
p, blockquote 190,0,0,0,0 ->
It is best to choose headset elements that are close in size to the desired size of the portal.
p, blockquote 191,0,0,0,0 ->
From the dresser
A dresser with smooth facades is ideal. So there will be less trouble with the finish. If only a chest of drawers with decorated facades is at hand, then there are two solutions:
p, blockquote 192,0,0,0,0 ->
- during manufacture, select details so that the pattern on one element is a logical continuation of another. In this case, there will be much more waste and materials may not be enough to implement the idea,
- after finishing work, hide the facades under the figured bricks or stucco elements. This one is more costly but effective.
The rest of the production of props does not cause difficulties. The list of necessary materials and tools is rather scarce:
p, blockquote 193,0,0,0,0 ->
- old chest of drawers
- self-tapping screws
- Duplex,
- putty and paint for decor (or another set of finishing materials).
Below is a detailed instruction for making a false fireplace from a chest of drawers.
p, blockquote 194,0,0,0,0 ->
- All drawers and guides to them are taken out of the chest of drawers. Boxes are disassembled into separate components, pens are removed.

- Holes from handles and existing defects (chips, dents) are coated with putty and sanded with sandpaper after drying.

- The front plank from the top drawer returns to its original place and is fixed with screws. If there is no way to leave the self-tapping screws on the inside, then they need to be drowned a little in the facade, and after assembly, putty on the fastening places with putty.

- Facades from two more drawers become the side walls of the fireplace. They are attached using self-tapping screws and connecting plates (straight or L-shaped) to the side walls of the chest of drawers and the upper (horizontal) facade. They may need to be partially trimmed in length. If the dresser was narrow and high, you will have to cut the skeleton of the dresser. In this case, it is desirable to build a lower platform below (from an old countertop or piece of plywood). So the design will be more reliable and aesthetically pleasing. Or fix in the lower part another facade from the box horizontally (symmetrically to the upper).

- The final stage is the design decoration. Existing defects are putty. All surfaces are primed and painted in the desired color or glued with wallpaper. Inside the hearth, you can place decorative firewood made of cardboard with your own hands. Or choose any other decor option - the main thing is that open flame and heating elements do not participate in the portal decoration.


If the chest of drawers was opened with varnish, then the putty will fall poorly on the glossy surface. In this case, it must either be treated with sandpaper, removing the varnish and making the surface rough, or beaten with a reinforcing mesh.
p, blockquote 195,0,0,0,0 ->

p, blockquote 196,0,0,0,0 ->
From the sideboard
The box for the fireplace from the sideboard is done in the same way. But due to other dimensions, the design will have a slightly different design.
p, blockquote 197,0,0,0,0 ->

p, blockquote 198,0,0,0,0 ->
The main differences include:
p, blockquote 199,0,0,0,0 ->
- a mirror back wall (it is present at 90% of old sideboards). This is not a problem, a false fireplace with a mirror looks very unusual and original - especially if you add lighting and imitation of logs to the hearth,
- due to other proportions, the design will turn out to be quite high. So that such an imitation does not look bulky and disproportionate, it is desirable to equip a blower below. In this case, the height of the false fireplace will be logical and reasonable.
Material List and Procedure remain the same as when working with a chest of drawers:
p, blockquote 200,0,0,0,0 ->
- all doors are removed from the skeleton. Drawers and shelves are removed and disassembled. If the shelves and facade were glass, materials for the manufacture of the fireplace may not be enough. In this case, you have to use the remnants of other furniture, or buy a sheet of plywood or chipboard,
- in the lower part a blower is equipped. To do this, the two lower doors are interconnected using wooden planks (or anchor plates) and self-tapping screws. All fastenings are preferably done from the inside. So the look of the finished structure will be more aesthetic. The finished facade is attached to the side walls of the sideboard. After decoration inside the blower, it will be possible to place an imitation of firewood and ash,
- a portal is being built at the top (from plywood or furniture debris). Its size and shape are selected for the interior of the apartment,
- decorative mantelpiece and base are made as needed (if the design is not very stable or looks incomplete). For these purposes, you can use headboards from old beds, pallets, etc.,
- all surfaces are cleaned with a grinder, they are putty, primed and decorated with the chosen method.
It should be remembered that in the manufacture of such a decorative fireplace, the finish should be with a minimum of heating elements or without them at all. Upon contact with an open flame, such a portal may catch fire.
p, blockquote 201,0,0,0,0 ->
Polyurethane
Polyurethane falshkin is much less common, since this material, although it is known, has not yet received such widespread use as polystyrene or plywood.
p, blockquote 202,0,0,0,0 ->
Polyurethane is sold in the same way as chipboard sheets. They can be either a standard size of 1000x2000 mm, or any other (on request). Sheet thickness can be from 5 to 200 mm. Therefore, you can choose the right blanks for any design of a decorative fireplace.
p, blockquote 203,0,0,0,0 ->

p, blockquote 204,0,0,0,0 ->
To make a hearth at home, you will need:
p, blockquote 205,0,0,0,0 ->
- polyurethane,
- two types of glue for polyurethane (for connecting parts to each other and for fixing the fireplace to the walls),
- hacksaw,
- level,
- ruler
- miter box (for forming angles),
- spatulas
- screwdriver
- self-tapping screws
- skin
- tools and materials for decorating.
You can do without a screwdriver, connecting all the parts with glue, but with additional fixing with screws, the design will turn out to be more reliable.
p, blockquote 206,0,0,0,0 ->
Decor Options
Choosing the suitable finishing option, you must first focus on the color scheme and the general style of the apartment in which the portal will be located. So, a white fireplace from the boxes will look like a foreign body in a high-tech room with an abundance of chrome surfaces and modern technology. But it can quite organically fit into more relaxed classic interiors.
p, blockquote 208,0,0,0,0 ->

p, blockquote 209,0,0,0,0 ->
It is also worth considering the degree of mobility of the fireplace. For portable and folding models, you can apply more daring and vivid ideas. Even if they turn out to be not very successful, in a couple of weeks this version of the fireplace will still go to waste, and next time it will be possible to make an imitation of the portal with a different finish, taking into account previous mistakes.
p, blockquote 210,0,0,0,0 ->
The decoration of a stationary decorative fireplace should be approached more thoughtfully. Errors made during its decoration will be more difficult and expensive to correct.
p, blockquote 211,0,0,0,0 ->
In this case, it is advisable to pre-make a fireplace scheme from paper or draw a 3-D sketch of the room in a special program. So the overall design will be perceived more clearly.
p, blockquote 212,0,0,0,0 ->
New Year and Christmas
Most often, temporary frauds are made specifically for the Christmas holidays. Such Christmas decorations create a festive mood and add coziness to the home atmosphere.
p, blockquote 213,0,0,0,0 ->
In this case, a combination of a winter (silver-white-blue) and Christmas (green-red-gold) palette is used for framing. To complement the classic colors of the finish can insert from natural materials (wood, stone, etc.).
p, blockquote 214,0,0,0,0 ->

p, blockquote 215,0,0,0,0 ->
Otherwise, there are no restrictions - all Christmas attributes are acceptable:
p, blockquote 216,0,0,0,0 ->
- figures of Santa Claus and the Snow Maiden,
- wreaths and garlands of needles,
- Christmas decorations and cones,
- candles
- fruits and sweets
- Christmas socks
- electric lights
- Stuffed Toys.
Do not forget that an excess of jewelry can create a cluttered effect.
p, blockquote 218,0,0,0,0 ->

p, blockquote 219,0,0,0,0 ->
How can I glue it?
Choosing the gluing option, you need to start from whether it will be a topcoat, or a layer of paint or varnish will go over it.
p, blockquote 220,0,0,0,0 ->
For the finish fit:
p, blockquote 221,0,0,0,0 ->
- wallpaper,
- thick white paper
- old newspapers
- ceiling tile (it is cut to size of brick before gluing and artificially aged if necessary),
- tile,
- false bricks (they can be made of cardboard, polystyrene, etc.),
- panels that imitate natural stone boards.
When choosing a material, it is necessary to take into account the degree of its fire resistance (if the false fireplace is made using heating elements).
p, blockquote 222,0,0,0,0 ->

p, blockquote 223,0,0,0,0 ->
For painting, it is better to choose light and plain paper, wallpaper or cardboard. Or at least without pronounced patterns that can appear through a layer of paint.
p, blockquote 224,0,0,0,0 ->
Drawn
There are several ways to create a drawn hearth. You can display:
p, blockquote 225,0,0,0,0 ->
- whole fireplace
- only the inside of the portal (fire, firewood, coals),
- use the picture as part of the decorations of the frame of the false fireplace (depict bricks, wild stone, timber, etc.).
You need to choose the level of difficulty based on your own artistic skills and the materials at hand for drawing.
p, blockquote 226,0,0,0,0 ->

p, blockquote 227,0,0,1,0 ->
Depending on the decoration of the room, you can draw directly on the walls, on a finished false fireplace or on a paper, and it can already be fixed to the wall.
p, blockquote 228,0,0,0,0 ->
On the Internet there are many options for painted fireplaces. Following simple step-by-step instructions, you can get a very decent result. The main thing is not to threaten too complex models.
p, blockquote 229,0,0,0,0 ->
If you have any doubts about your own abilities, you should initially try to reproduce the selected design on a regular A4 sheet, on a smaller scale. If the result is satisfactory, you can proceed to decorate the fireplace. If it turned out not quite what you wanted, then you need to either practice or choose a simpler model.
p, blockquote 230,0,0,0,0 ->
Before you draw a fireplace on the wall, you need to clean it and preferably degrease it. When choosing paints you need to consider the finish of the wall.
p, blockquote 231,0,0,0,0 ->
For a long-lasting image, drawing materials are best chosen at a hardware store. If the picture will be depicted on canvas or whatman paper and left for scrap at the end of the Christmas holidays, then you need to look for suitable materials in an art or office supply store.
p, blockquote 232,0,0,0,0 ->
You should not draw small details right away. It is better to draw a fireplace in stages:
p, blockquote 233,0,0,0,0 ->
- markup
- contours
- large items
- small parts,
- decorations (if any).

p, blockquote 234,0,0,0,0 ->
To paint the finished sketch, you also need layers. For the correct choice of the sequence of application of paints, you need to carefully consider the sample on which the source is reproduced.
p, blockquote 235,0,0,0,0 ->
If with artistic skills it’s really bad, then you can print your favorite picture on whatman paper.But here you need to monitor image quality - the picture may turn out blurry and not as bright as we would like.
p, blockquote 236,0,0,0,0 ->
Vinyl stickers may be a substitute for the printed image. With their help, you can quickly recreate any design and size of the fireplace. You can choose the right option for any room style: from retro to hi-tech.
p, blockquote 237,0,0,0,0 ->
The only drawback of vinyl is its poor color palette. With the help of such stickers, the image is monophonic, less often there are options in two or three colors. It is impossible to convey the glare of shadows, sparks of fire and the festive atmosphere using vinyl.
p, blockquote 238,0,0,0,0 ->

p, blockquote 239,0,0,0,0 ->
Tiled
Tiles should not be understood as tiles. You can, of course, use it, but more often use lighter variations of artificial materials:
p, blockquote 240,0,0,0,0 ->
- Styrofoam
- polyurethane
- cardboard
- paper
- ceiling tiles
- wall panels.

p, blockquote 241,0,0,0,0 ->
When choosing the best option, should focus on five "lighthouses":
p, blockquote 242,0,0,0,0 ->
- material of which the fireplace is made. If the base is not too reliable, then preference should be given to lighter finishing materials,
- budget. Different finishes differ significantly in cost, while the result often gives almost identical,
- expenditure of time and energy. If you need to make a fireplace in one day, it is better to give preference to ready-made options, rather than spend hours cutting and decorating cardboard bricks,
- Colour. When reconstructing New Year's decor, white color is most often used for decoration. There are other decoration options: for natural materials, for the color of walls or furniture, etc.
- necessary result. Each material has its own texture. Accordingly, the same design, reproduced in different materials, will have a different look.
Do not forget about the level of fire resistance of finishing materials. But this item applies only to those models of the Christmas fireplace, inside which are located heating appliances or electric lights.
p, blockquote 243,0,0,0,0 ->
From MDF
This decoration option is used much less often, since there are many more budgetary ways to design a fireplace simulator.
p, blockquote 244,0,0,0,0 ->
Typically, MDF finish is done for stationary fireplaces, inside of which there are hidden niches or shelves.
p, blockquote 245,0,0,0,0 ->

p, blockquote 246,0,0,0,0 ->
New Year's room with a fireplace made of MDF to the color of the furniture looks very solid and solemn. Such a portal as a wooden one looks, but its cost is several times cheaper than that of a real array.
p, blockquote 247,0,0,0,0 ->
The design of MDF can withstand a fairly large load, so you can supplement the decor with almost any elements:
p, blockquote 248,0,0,0,0 ->
- decorations from fir branches,
- garlands
- compositions of fruits and candles,
- flower vases
- soft toys.
There are practically no restrictions for the embodiment of fantasies in this case.
p, blockquote 249,0,0,0,0 ->
From moldings, stucco moldings
The assortment of such products, presented on the shelves of construction stores, allows you to choose the perfect option for both minimalism and palace interiors in the Baroque and Empire style. Simple and concise forms, floral patterns, playful curls - an acceptable solution is for any occasion.
p, blockquote 250,0,0,0,0 ->
If you need something completely exclusive, then there is always the option of individually manufacturing trim elements from the right material. You can choose an ornament that mimics the pattern on the curtains, wallpaper or carpets. In this case, the fireplace will look like a logical continuation of the general style, completing the image.
p, blockquote 251,0,0,0,0 ->

p, blockquote 252,0,0,0,0 ->
From timber
A beautiful wooden fireplace can be the highlight of any interior. It is perfect for photo shoots or decorations for the new year. But, if the inner frame is also made of wood, then for the decor of the hearth it is better to use decorative logs or lights with a minimum of heating elements.
p, blockquote 253,0,0,0,0 ->
When implementing the interior "antique", you can use almost raw or artificially aged timber. An array of varnished varnishes is suitable for classic design.
p, blockquote 254,0,0,0,0 ->
Compared to other materials, this finishing method can be attributed to a rather expensive segment. Therefore, the accompanying decor should also match. With a natural array, cardboard bricks or a home-made drawing of a hearth with fire will hardly be organically combined.
p, blockquote 255,0,0,0,0 ->

p, blockquote 256,0,0,0,0 ->
Hearth illumination
When constructing a backlight, you need to remember safety. The more fire hazardous materials used to create an artificial fireplace, the less heating elements should be in and around it.
p, blockquote 257,0,0,0,0 ->
All methods for the design of the outbreak can be divided into three categories:
p, blockquote 258,0,0,0,0 ->
- safe
- relatively safe
- dangerous.
Safe decoration methods include decorations that are not related to fire and electricity. It can be flame drawings, real or fake logs (unlit), soft toys, etc. These methods of decorating the fireplace should be chosen for children's rooms and apartments with pets.
p, blockquote 259,0,0,0,0 ->
Conditionally safe flame variants are created using electricity. It can be a variety of garlands, LED strips, bio-fireplaces, etc. Subject to safety measures, they will not cause harm, but in case of malfunction or careless handling may cause a fire.
p, blockquote 260,0,0,0,0 ->
In the video, as an example, the original method of creating a reliable flame with "smoke" is presented using lamps, a fan and a steam generator (water, controllers and decoders included).
p, blockquote 261,0,0,0,0 ->
p, blockquote 262,0,0,0,0 ->

p, blockquote 263,0,0,0,0 ->
Dangerous options for lighting a fireplace use open fire. Such methods can not be used in rooms where there are small children and pets. Also, these methods are not suitable for illuminating decorative fireplaces made of flammable materials.
p, blockquote 264,0,0,0,0 ->
Most often, open fire is used in the form of a fireplace of candles. They are placed on special stands or on the lower shelf of the fireplace. Another non-standard solution can be considered placing lighted candles inside the logs. This design looks very unusual, but in this case, you need to especially carefully monitor security.
p, blockquote 265,0,0,0,0 ->

p, blockquote 266,0,0,0,0 ->
Ideas for a photo zone with a fireplace
Photosessions are different: home, office, public.
p, blockquote 267,0,0,0,0 ->
When preparing a home photo zone, you need to focus on the general style of the room and the images of households prepared for the photo shoot. In this case, the tree and the Christmas fireplace should have common elements.
p, blockquote 268,0,0,0,0 ->
It is desirable that some color schemes resonate with shades and patterns on the outfits of "fashion models." But the main thing here is not to overdo it, otherwise there is a risk that the posing will merge with the interior.
p, blockquote 269,0,0,0,0 ->
When equipping office and public photo zones, preference should be given to classic color combinations. Shades that suit any style and color: white, red, silver, etc. After all, the outfits and images of different people can be very different.
p, blockquote 270,0,0,0,0 ->
But you should not use the abundance of shiny materials, in the light of the flash, extraneous glare can not create the effect that was intended.
p, blockquote 271,0,0,0,0 ->

p, blockquote 272,0,0,0,0 ->
The most common extras for a photo shoot with a fireplace include:
p, blockquote 273,0,0,0,0 ->
- candles. You can use burning, and new, unlit,
- a plaid or fur skin spread in front of the hearth,
- rocking chair
- a basket with a bottle of wine and glasses,
- Stuffed Toys,
- decorative pillows,
- New Year's compositions (wreaths and bouquets of needles, garlands and Christmas toys, cones and artificial snow),
- antique lanterns and candlesticks,
- "Gifts" and Christmas socks.
Given the fact that the fireplace has been an integral attribute of any home for centuries, it can become a universal element for any photo shoot. The main thing is to choose the right style and surroundings.
p, blockquote 274,0,0,0,0 ->
To imitate the style of a hunting lodge, add animal models, skins and weapons. When organizing a photo zone for a high-tech party, build a “flying” hanging fireplace.
p, blockquote 275,0,0,0,0 ->
An interesting solution can be found for any occasion.
p, blockquote 276,0,0,0,0 ->

p, blockquote 277,0,0,0,0 ->
How to fit into the interior?
The specificity of the fireplace is such that it becomes a key element of the room. The rest of the interior is a fireplace frame.
p, blockquote 278,0,0,0,0 ->
If during the repair process a stationary portal is equipped, then you should start creating the style of the room by choosing a model of a false fireplace. The rest of the design is matched to it.
p, blockquote 279,0,0,0,0 ->
Temporary pseudo-fireplaces are installed in the finished interior. Therefore, you need to carefully monitor that the selected model does not get out of the general surroundings of the room.
p, blockquote 280,0,0,0,0 ->
Also, when choosing a place for a false fireplace, you need to consider its functionality. If he will warm the room, or a reliable imitation of fire will be installed in it, then sofas or armchairs should be located next to such a portal. To enjoy the comfort of the hearth for long evenings.
p, blockquote 281,0,0,0,0 ->

p, blockquote 282,0,0,0,0 ->
In the case of a purely decorative function of a false fireplace, you need to ensure that it does not become a useless dust collector cluttering up space.
p, blockquote 283,0,0,0,0 ->
It is also worth observing the proportions. The huge portal, installed in a small room, will look foreign, regardless of the style of execution and materials used in the decoration. In the same way, a small fireplace will be lost in the space of a large room.
p, blockquote 284,0,0,0,0 ->
Depending on the style decision, a false fireplace can be located:
p, blockquote 285,0,0,0,0 ->
- in the corner,
- in the center of the room,
- along the wall.
There are no strict rules for placing a decorative hearth. Choosing a place, you need to focus on your own taste and layout of the room. In this case, such scenery will make the room more solemn and elegant.
p, blockquote 286,0,0,0,0 ->

p, blockquote 287,0,0,0,0 ->
Photo ideas for inspiration

p, blockquote 288,0,0,0,0 ->

p, blockquote 289,0,0,0,0 ->

p, blockquote 290,0,0,0,0 ->

p, blockquote 291,0,0,0,0 ->

p, blockquote 292,0,0,0,0 ->

p, blockquote 293,0,0,0,0 ->

p, blockquote 294,0,0,0,0 ->

p, blockquote 295,0,0,0,0 ->

p, blockquote 296,0,0,0,0 ->

p, blockquote 297,0,0,0,0 ->

p, blockquote 298,0,0,0,0 ->

p, blockquote 299,0,0,0,0 ->

p, blockquote 300,0,0,0,0 ->

p, blockquote 301,0,0,0,0 ->

p, blockquote 302,0,0,0,0 -> p, blockquote 303,0,0,0,1 ->